
Build gasless, secure token transfers with typed signatures
| Author: Zodomo | X | Warpcast | GitHub | Blog |
I needed to utilize permit2’s witness functionality in Omni SolverNet to add gasless orders. Some of the data structures I had to use were extremely complex. When researching EIP-712 and permit2, I found that documentation for both was rather lacking. EIP-712 is easier to use on flat structs, and many projects use it on such. However, ERC-7683’s ResolvedCrossChainOrder struct (used in SolverNet) is quite complex, has nested struct arrays, and dynamic values such as byte arrays.
I could find no good examples for how to properly build out my typehashes, let alone how to properly sign the orders in Solidity within Foundry tests. However, with the release of Claude 4, I was able to have it comprehensively teach me everything I needed to know about EIP-712 and permit2, especially its witness logic.
So, I decided to take what I learned and produce a document to help guide new devs through fully learning how to use these tools, while understanding their importance. As I pretty much solely work in Foundry, I also walk through signing these structs in Solidity, in order to assist with testing such integrations. Throughout this document, I introduce these concepts through the scope of building an onchain bug bounty system.
Other resources are available elsewhere to showcase how to produce these signatures offchain with software such as ethers, viem, or wagmi.
Understanding EIP-712: Making Signatures Human-Readable
The Problem: Users Signing Blind
Imagine you’re building a decentralized bug bounty platform where security researchers get paid in tokens for finding vulnerabilities. Before EIP-712, if a project team wanted to approve a bounty, they’d see something like this in their wallet:
Sign this message: 0x1c8aff950685c2ed4bc3174f3472287b56d9517b9c948127319a09a7a36deac8 That’s completely meaningless to humans. The team has no idea if they’re signing a claim for a legitimate $1,000 bounty or accidentally signing away their entire wallet. This experience creates massive security risks and terrible user experiences.
EIP-712: The Solution
EIP-712 (Ethereum Improvement Proposal 712) solves this by letting users sign structured, meaningful data that wallets can display clearly. Instead of mysterious hex, project teams see exactly what they’re signing:
{ "Bounty Payment": { "recipient": "0x742d35cc6634c0532925a3b8d428c1e21c2a2e59", "amount": "10000 USDC", "bugId": "SOL-2025-003", "severity": "Critical", "deadline": "2025-01-15 14:30:00 UTC" } } Bringing clarity to the information being signed makes crypto more secure and user-friendly.
How EIP-712 Works Under the Hood
When you sign structured data with EIP-712, the process combines three essential components into a final hash that gets signed. Think of it like creating a tamper-proof package with multiple security seals:
Final Hash = keccak256("\x19\x01" ‖ Domain Separator ‖ Struct Hash) The \x19\x01 prefix is a magic value that prevents this signature from ever being confused with a regular Ethereum transaction. Let’s break down the other components:
1. Domain Separator: Your App’s Unique Fingerprint
The domain separator is like a unique seal that ensures signatures can only be used in your specific application. It prevents replay attacks across different protocols. Here’s what it contains:
struct EIP712Domain { string name; // "HackerBounty" string version; // "1" uint256 chainId; // 1 (Ethereum mainnet) address verifyingContract; // 0x1234...abcd } Each field serves a critical purpose:
- name: Your protocol’s name.
- version: Allows you to upgrade your protocol while invalidating old signatures
- chainId: Prevents signatures from Ethereum being used on Arbitrum or other chains
- verifyingContract: Ties signatures to your specific deployed contract address
The domain separator is computed once and can be stored:
bytes32 DOMAIN_SEPARATOR = keccak256(abi.encode( keccak256("EIP712Domain(string name,string version,uint256 chainId,address verifyingContract)"), keccak256(bytes("HackerBounty")), keccak256(bytes("1")), block.chainid, address(this) )); This unique set of variables ensures that every app can avoid signature reuse between other applications, or even incompatible versions of itself.
2. Type Hash: The Structure Definition
Every data structure you want to sign needs a type hash. Think of it as a schema definition that ensures both the signer and verifier agree on exactly what fields exist and their types. For our bug bounty payment:
struct BountyPayment { address recipient; uint256 amount; string bugId; uint8 severity; uint256 deadline; } // The type hash is the keccak256 of the struct definition string bytes32 PAYMENT_TYPEHASH = keccak256( "BountyPayment(address recipient,uint256 amount,string bugId,uint8 severity,uint256 deadline)" ); This type hash becomes part of the struct hash (explained next), ensuring that even if an attacker tries to add or remove fields, the signature becomes invalid.
3. Struct Hash: Encoding Your Actual Data
This is where your actual bounty payment data gets encoded and hashed. The encoding follows specific rules based on the data types:
function hashPayment(BountyPayment memory payment) pure returns (bytes32) { return keccak256(abi.encode( PAYMENT_TYPEHASH, // Always first - identifies the struct type payment.recipient, // address: encoded as-is (static type) payment.amount, // uint256: encoded as-is (static type) keccak256(bytes(payment.bugId)), // string: must be hashed first (dynamic type) payment.severity, // uint8: encoded as-is (static type) payment.deadline // uint256: encoded as-is (static type) )); } Critical Encoding Rules:
- Static types (address, uint, bool, bytes1-bytes32) are encoded directly with
abi.encode - Dynamic types (string, bytes, arrays) must be hashed with
keccak256first - The type hash always comes first in the encoding
- Field order must match the type definition exactly
Putting It All Together
Here’s the complete flow for creating an EIP-712 signature:
// 1. Define your struct and create an instance BountyPayment memory payment = BountyPayment({ recipient: 0x742d35cc6634c0532925a3b8d428c1e21c2a2e59, amount: 10000 * 10**6, // 10000 USDC (6 decimals) bugId: "SOL-2025-003", severity: 4, // Critical deadline: block.timestamp + 24 hours }); // 2. Hash the struct bytes32 structHash = hashPayment(payment); // 3. Create the final digest bytes32 digest = keccak256(abi.encodePacked( "\x19\x01", DOMAIN_SEPARATOR, structHash )); // 4. Sign the digest (in practice, this happens in the project team's wallet, but this is how foundry does it) (uint8 v, bytes32 r, bytes32 s) = vm.sign(privateKey, digest); Verifying EIP-712 Signatures in Your Contract
Once a project team submits their signed payment authorization, your contract needs to verify it:
contract HackerBounty { bytes32 public constant DOMAIN_SEPARATOR = /* computed at deployment */; mapping(address => uint256) public nonces; mapping(string => bool) public processedBugs; mapping(address => bool) public authorizedProjects; function processBountyPayment( BountyPayment calldata payment, uint8 v, bytes32 r, bytes32 s ) external { // Prevent double-processing require(!processedBugs[payment.bugId], "Bug already processed"); require(payment.deadline >= block.timestamp, "Payment expired"); // Recreate the digest bytes32 digest = keccak256(abi.encodePacked( "\x19\x01", DOMAIN_SEPARATOR, hashPayment(payment) )); // Recover the signer (should be the project team) address projectTeam = ecrecover(digest, v, r, s); require(authorizedProjects[projectTeam], "Unauthorized project"); // Mark as processed and pay out processedBugs[payment.bugId] = true; IERC20(USDC).transferFrom(projectTeam, payment.recipient, payment.amount); emit BountyPaid(payment.recipient, payment.bugId, payment.amount); } } Advanced EIP-712: Nested Structs
As your bug bounty platform grows, you might need more complex data structures. EIP-712 supports nested structs, but they require special handling:
struct PaymentDetails { string bugId; uint8 severity; string description; } struct AdvancedPayment { address recipient; uint256 amount; PaymentDetails details; // Nested struct uint256 deadline; } When working with nested structs:
- Each nested struct needs its own type hash
- Hash nested structs separately, then use their hash in the parent
- Type definitions must include all referenced structs
bytes32 constant DETAILS_TYPEHASH = keccak256( "PaymentDetails(string bugId,uint8 severity,string description)" ); bytes32 constant ADVANCED_PAYMENT_TYPEHASH = keccak256( "AdvancedPayment(address recipient,uint256 amount,PaymentDetails details,uint256 deadline)PaymentDetails(string bugId,uint8 severity,string description)" ); function hashAdvancedPayment(AdvancedPayment memory payment) pure returns (bytes32) { // First hash the nested struct bytes32 detailsHash = keccak256(abi.encode( DETAILS_TYPEHASH, keccak256(bytes(payment.details.bugId)), // dynamic type payment.details.severity, keccak256(bytes(payment.details.description)) // dynamic type )); // Then hash the parent struct using the nested struct's hash return keccak256(abi.encode( ADVANCED_PAYMENT_TYPEHASH, payment.recipient, payment.amount, detailsHash, // Use the hash, not the struct itself payment.deadline )); } Advanced EIP-712: Array Types
Real-world bug bounty platforms often need to handle multiple actions or data points in a single transaction. Perhaps a project team wants to pay multiple researchers for different vulnerabilities, or your platform needs to process batched bounty payouts. EIP-712 supports arrays, but they follow specific hashing rules that are crucial to understand.
Basic Array Types
Let’s start with simple arrays of basic types:
struct BatchPayout { address[] recipients; // Array of researcher addresses uint256[] amounts; // Array of payment amounts string[] bugIds; // Array of bug IDs uint256 deadline; } bytes32 constant BATCH_PAYOUT_TYPEHASH = keccak256( "BatchPayout(address[] recipients,uint256[] amounts,string[] bugIds,uint256 deadline)" ); Key rules for basic arrays:
- Array types are denoted with
[]in the type definition - Arrays are always treated as dynamic types, even if they contain static elements
- Arrays must be hashed using
keccak256before encoding in the parent struct
function hashBatchPayout(BatchPayout memory payout) pure returns (bytes32) { return keccak256(abi.encode( BATCH_PAYOUT_TYPEHASH, keccak256(abi.encodePacked(payout.recipients)), // Hash the packed array keccak256(abi.encodePacked(payout.amounts)), // Hash the packed array keccak256(abi.encodePacked( // String arrays need special handling keccak256(bytes(payout.bugIds[0])), // Hash each string element keccak256(bytes(payout.bugIds[1])), // then pack and hash the result // ... for each element )), payout.deadline )); } Arrays of Structs: The Complex Case
The most sophisticated scenario involves arrays of custom structs. Imagine your bug bounty platform needs to handle multiple vulnerability payouts in a single transaction:
struct VulnerabilityPayout { string bugId; uint8 severity; string description; address recipient; } struct MultiPayoutAuthorization { address projectTeam; VulnerabilityPayout[] payouts; // Array of structs uint256 totalAmount; uint256 deadline; } This requires careful handling of the type definitions and hashing:
// Individual struct type hash bytes32 constant VULNERABILITY_PAYOUT_TYPEHASH = keccak256( "VulnerabilityPayout(string bugId,uint8 severity,string description,address recipient)" ); // Main struct type hash, all referenced structs are included alphabetically bytes32 constant MULTI_PAYOUT_TYPEHASH = keccak256( "MultiPayoutAuthorization(address projectTeam,VulnerabilityPayout[] payouts,uint256 totalAmount,uint256 deadline)VulnerabilityPayout(string bugId,uint8 severity,string description,address recipient)" ); The Array Hashing Algorithm
Arrays of structs follow a specific concatenation and hashing pattern defined by EIP-712:
function _hashPayoutArray(VulnerabilityPayout[] memory payouts) internal pure returns (bytes32) { // Handle empty arrays if (payouts.length == 0) { return keccak256(""); } // For non-empty arrays: hash each element, concatenate, then hash the result bytes memory encodedPayouts = ""; for (uint256 i = 0; i < payouts.length; i++) { // Hash each struct individually using its type hash bytes32 payoutHash = keccak256(abi.encode( VULNERABILITY_PAYOUT_TYPEHASH, keccak256(bytes(payouts[i].bugId)), // Dynamic type: hash first payouts[i].severity, // Static type: encode directly keccak256(bytes(payouts[i].description)), // Dynamic type: hash first payouts[i].recipient // Static type: encode directly )); // Concatenate this hash to our running bytes encodedPayouts = abi.encodePacked(encodedPayouts, payoutHash); } // Hash the concatenated result return keccak256(encodedPayouts); } function hashMultiPayoutAuthorization(MultiPayoutAuthorization memory auth) pure returns (bytes32) { return keccak256(abi.encode( MULTI_PAYOUT_TYPEHASH, auth.projectTeam, _hashPayoutArray(auth.payouts), // Use the hash of the array auth.totalAmount, auth.deadline )); } Empty Arrays and Edge Cases
Empty arrays have special handling that’s important to understand:
function demonstrateEmptyArrays() pure returns (bytes32) { VulnerabilityPayout[] memory emptyPayouts = new VulnerabilityPayout[](0); // Empty arrays hash to keccak256("") bytes32 emptyHash = _hashPayoutArray(emptyPayouts); assert(emptyHash == keccak256("")); return emptyHash; } This ensures that empty arrays have a consistent, deterministic hash while remaining distinct from other empty data.
Practical Example: Multi-Vulnerability Payout Authorization
Here’s how a complete multi-vulnerability payout authorization would work:
function authorizeMultiplePayouts() external { // Create multiple vulnerability payouts VulnerabilityPayout[] memory payouts = new VulnerabilityPayout[](2); payouts[0] = VulnerabilityPayout({ bugId: "RE-2025-003", severity: 4, // Critical description: "Reentrancy can drain the contract in one transaction", recipient: 0x1234567890123456789012345678901234567890 // Researcher A }); payouts[1] = VulnerabilityPayout({ bugId: "DEP-2025-002", severity: 2, // Medium description: "Bad order construction can lead to user deposits not being refunded", recipient: 0xABCDEF1234567890123456789012345678901234 // Researcher B }); MultiPayoutAuthorization memory authorization = MultiPayoutAuthorization({ projectTeam: msg.sender, payouts: payouts, totalAmount: 5000 * 10**6, // 5000 USDC total deadline: block.timestamp + 7 days }); // The hash includes all payout data in a tamper-proof way bytes32 authHash = hashMultiPayoutAuthorization(authorization); // Project team signs this hash, knowing exactly what researchers they're paying // Wallet will display the structured data clearly // {Payment splitting and processing logic} } Critical Rules for Array Hashing
- Empty Arrays: Always hash to
keccak256("") - Non-Empty Static Type Arrays: Hash the entire
abi.encodePackedarray - Non-Empty Dynamic Type Arrays: Hash each element individually, concatenate with
abi.encodePacked, then hash the result - Dynamic Types in Arrays: String and bytes fields within array elements must be hashed before encoding
- Order Matters: Array element order affects the final hash
- Type Definitions: Include all referenced struct types in alphabetical order
Array Type String Construction
When arrays are involved, your type strings become more complex but follow predictable patterns:
// For arrays of structs, all referenced types must be included string constant MULTI_PAYOUT_TYPE_STRING = "MultiPayoutAuthorization(address projectTeam,VulnerabilityPayout[] payouts,uint256 totalAmount,uint256 deadline)VulnerabilityPayout(string bugId,uint8 severity,string description,address recipient)"; // For simple arrays string constant BATCH_PAYOUT_TYPE_STRING = "BatchPayout(address[] recipients,uint256[] amounts,string[] bugIds,uint256 deadline)"; Common Array Pitfalls
- Forgetting Empty Array Handling: Always check for empty arrays and return
keccak256("") - Wrong Concatenation Method: Use
abi.encodePackedfor concatenating hashes, notabi.encode - Type String Mismatches: Array notation in type strings must exactly match struct definitions
- Dynamic Type Confusion: Remember that arrays themselves are always dynamic, even arrays of static types
- Order Dependencies: Changing array element order changes the hash - ensure consistent ordering
Understanding array hashing is crucial for building sophisticated EIP-712 systems. The patterns you’ve learned here will handle the vast majority of real-world scenarios, from simple batch operations to complex multi-struct arrays.
General EIP-712 Pitfalls and Best Practices
- Dynamic Type Encoding: Always hash strings, bytes, and arrays before encoding
- Field Order: Must match exactly between type definition and encoding
- Type String Format: No spaces except after commas, exact type names
- Nested Struct Definitions: Include all referenced structs in alphabetical order
- Domain Separator Caching: Can be computed once at deployment if chainId won’t change
Now that you understand EIP-712’s structured signatures, let’s see how Permit2 builds on this foundation to create a universal token approval system in the next section.
Permit2: The Ultimate Token Permission System
The Traditional Approval Problem
Before diving into permit2’s solutions, let’s understand the fundamental problem it solves. In traditional ERC-20 token systems, if your bug bounty platform wants to process payments from project teams to security researchers, you face a cumbersome two-step process:
// Step 1: Project team approves your contract (requires gas) IERC20(token).approve(bugBountyContract, amount); // Step 2: Your contract transfers tokens to researchers (requires more gas) IERC20(token).transferFrom(projectTeam, researcher, amount); This creates several problems for your bug bounty platform:
- Poor User Experience: Project teams must send two separate transactions per payout
- Gas Inefficiency: Each approval costs gas, even if never used
- Security Risks: Unlimited approvals create attack vectors
- No Expiration: Approvals persist indefinitely
- Inflexibility: Can’t bundle approvals with complex logic
What is Permit2?
Permit2 is Uniswap’s battle-tested signature-based token permission system deployed at 0x000000000022D473030F116dDEE9F6B43aC78BA3 on all major networks. It solves the approval problem by introducing:
- Signature-based permissions instead of on-chain approvals
- Time-bound and amount-limited token access
- Batch operations for multiple tokens
- Gasless approvals that don’t require upfront transactions
- Witness data for custom protocol logic (covered in Section 3)
Your bug bounty platform benefits in multiple ways:
- Project teams sign once instead of sending multiple transactions for each researcher payout
- You can bundle token transfers with vulnerability verification logic
- Time-limited permissions reduce long-term security risks
- Batch operations enable complex multi-researcher bounty payouts
Permit2’s Dual Architecture
Permit2 provides two complementary systems, each optimized for different use cases:
interface IPermit2 is ISignatureTransfer, IAllowanceTransfer { // Unified interface providing maximum flexibility } System Comparison at a Glance
| Feature | AllowanceTransfer | SignatureTransfer |
|---|---|---|
| Use Case | Traditional approvals with signatures | One-time direct transfers |
| Setup | Sign once, transfer many times | Sign per transfer |
| Nonce Management | Ordered (sequential) | Unordered (bitmap-based) |
| Best For | Recurring payments, subscriptions | Order fulfillment, atomic swaps |
| Gas Efficiency | Optimal for multiple transfers | Optimal for single transfers |
AllowanceTransfer: Enhanced Traditional Approvals
AllowanceTransfer modernizes the traditional approval pattern with signature-based permissions. Think of it as “allowances with expiration dates and gasless setup.”
Core Data Structures
struct PermitDetails { address token; // The ERC20 token address uint160 amount; // Maximum spendable amount uint48 expiration; // Unix timestamp when permission expires uint48 nonce; // Ordered nonce for replay protection } struct PermitSingle { PermitDetails details; // The permission details address spender; // Who can spend the tokens uint256 sigDeadline; // Signature validity deadline } struct PackedAllowance { uint160 amount; // Current remaining allowance uint48 expiration; // When this allowance expires uint48 nonce; // Current nonce for this owner/token/spender } How AllowanceTransfer Works
The AllowanceTransfer system maintains a three-dimensional mapping that tracks permissions:
mapping(address => mapping(address => mapping(address => PackedAllowance))) public allowance; // owner => token => spender => permission details For your bug bounty platform, here’s how a project team would grant permission for researcher payouts:
// 1. Project team creates a permit for your contract to spend their tokens for bounties PermitSingle memory permit = PermitSingle({ details: PermitDetails({ token: address(USDC), amount: 10000 * 10**6, // 10,000 USDC maximum for bounties expiration: block.timestamp + 30 days, // Valid for 30 days nonce: currentNonce // Current nonce for this project/token/spender }), spender: address(bugBountyContract), // Your contract address sigDeadline: block.timestamp + 1 hours // Signature must be used within 1 hour }); // 2. Project team signs the permit (off-chain, no gas) bytes memory signature = signPermit(permit, projectTeamPrivateKey); // 3. Anyone can submit the signed permit to grant permission permit2.permit(projectTeam, permit, signature); AllowanceTransfer EIP-712 Implementation
AllowanceTransfer uses specific EIP-712 structures for signature verification:
// Type hashes used internally by permit2 bytes32 constant PERMIT_DETAILS_TYPEHASH = keccak256( "PermitDetails(address token,uint160 amount,uint48 expiration,uint48 nonce)" ); bytes32 constant PERMIT_SINGLE_TYPEHASH = keccak256( "PermitSingle(PermitDetails details,address spender,uint256 sigDeadline)PermitDetails(address token,uint160 amount,uint48 expiration,uint48 nonce)" ); // Your signature generation for AllowanceTransfer function generateAllowanceSignature( PermitSingle memory permit, uint256 privateKey ) internal view returns (bytes memory) { // Hash the PermitDetails struct bytes32 detailsHash = keccak256(abi.encode( PERMIT_DETAILS_TYPEHASH, permit.details.token, permit.details.amount, permit.details.expiration, permit.details.nonce )); // Hash the main PermitSingle struct bytes32 structHash = keccak256(abi.encode( PERMIT_SINGLE_TYPEHASH, detailsHash, permit.spender, permit.sigDeadline )); // Create final EIP-712 hash bytes32 hash = keccak256(abi.encodePacked( "\x19\x01", permit2.DOMAIN_SEPARATOR(), structHash )); // Sign and return (uint8 v, bytes32 r, bytes32 s) = vm.sign(privateKey, hash); return abi.encodePacked(r, s, v); } Using AllowanceTransfer in Your Bug Bounty Contract
Once permission is granted by a project team, your contract can transfer tokens to researchers using the familiar pattern:
contract BugBountyPlatform { IPermit2 public constant PERMIT2 = IPermit2(0x000000000022D473030F116dDEE9F6B43aC78BA3); function processRecurringBountyPayment( address projectTeam, address researcher, address token, uint160 amount, string calldata bugId ) external onlyAdmin { // Verify this project has valid permissions and researcher is eligible require(authorizedProjects[projectTeam], "Project not authorized"); require(verifiedResearchers[researcher], "Researcher not verified"); require(!processedBugs[bugId], "Bug already processed"); // Transfer tokens using existing AllowanceTransfer permission // This will deduct from the project team's granted allowance PERMIT2.transferFrom(projectTeam, researcher, amount, token); processedBugs[bugId] = true; emit BountyPaid(projectTeam, researcher, bugId, amount); } // Batch processing for multiple researcher payments function processBatchBountyPayments( IAllowanceTransfer.AllowanceTransferDetails[] calldata transfers ) external onlyAdmin { PERMIT2.transferFrom(transfers); } } Ordered Nonce Management in AllowanceTransfer
AllowanceTransfer uses ordered (sequential) nonces for each owner/token/spender combination:
// Nonces must be used in order: 0, 1, 2, 3, ... // If nonce 2 is used, nonces 0 and 1 become invalid function getCurrentNonce(address projectTeam, address token, address spender) external view returns (uint48 nonce) { (, , nonce) = permit2.allowance(projectTeam, token, spender); } // Project teams can invalidate future nonces if their key is compromised function invalidateFutureNonces(address token, address spender, uint48 newNonce) external { permit2.invalidateNonces(token, spender, newNonce); } SignatureTransfer: Direct One-Time Transfers
SignatureTransfer enables direct token transfers without pre-existing approvals. Each signature authorizes a specific transfer amount to specific recipients.
Core Data Structures
struct TokenPermissions { address token; // The ERC20 token to transfer uint256 amount; // Exact amount to transfer } struct PermitTransferFrom { TokenPermissions permitted; // Token and amount details uint256 nonce; // Unordered nonce for replay protection uint256 deadline; // Transfer must occur before this time } struct SignatureTransferDetails { address to; // Transfer recipient uint256 requestedAmount; // Amount to actually transfer (≤ permitted amount) } How SignatureTransfer Works
Unlike AllowanceTransfer, SignatureTransfer doesn’t store any state. Each signature is self-contained and authorizes a direct transfer:
// Project team signs permission for a specific bounty payment to a researcher PermitTransferFrom memory permit = PermitTransferFrom({ permitted: TokenPermissions({ token: address(USDC), amount: 5000 * 10**6 // Exactly 5,000 USDC }), nonce: 12345678901234567890, // Unordered nonce deadline: block.timestamp + 1 hours }); SignatureTransferDetails memory transferDetails = SignatureTransferDetails({ to: researcher, // Researcher receives the bounty requestedAmount: 5000 * 10**6 // Can be ≤ permitted amount }); // Generate signature (covered in detail in Section 1) bytes memory signature = generateSignatureTransferSignature(permit, projectTeamPrivateKey); // Execute the transfer in one call, no pre-existing approvals needed permit2.permitTransferFrom(permit, transferDetails, projectTeam, signature); SignatureTransfer EIP-712 Implementation
SignatureTransfer has its own EIP-712 structures optimized for direct transfers:
// Type hashes used internally by permit2 bytes32 constant TOKEN_PERMISSIONS_TYPEHASH = keccak256( "TokenPermissions(address token,uint256 amount)" ); bytes32 constant PERMIT_TRANSFER_FROM_TYPEHASH = keccak256( "PermitTransferFrom(TokenPermissions permitted,address spender,uint256 nonce,uint256 deadline)TokenPermissions(address token,uint256 amount)" ); // Your signature generation for SignatureTransfer function generateSignatureTransferSignature( PermitTransferFrom memory permit, address spender, uint256 privateKey ) internal view returns (bytes memory) { // Hash TokenPermissions bytes32 tokenPermissionsHash = keccak256(abi.encode( TOKEN_PERMISSIONS_TYPEHASH, permit.permitted.token, permit.permitted.amount )); // Hash PermitTransferFrom bytes32 structHash = keccak256(abi.encode( PERMIT_TRANSFER_FROM_TYPEHASH, tokenPermissionsHash, spender, // Your contract address permit.nonce, permit.deadline )); // Create final EIP-712 hash bytes32 hash = keccak256(abi.encodePacked( "\x19\x01", permit2.DOMAIN_SEPARATOR(), structHash )); // Sign and return (uint8 v, bytes32 r, bytes32 s) = vm.sign(privateKey, hash); return abi.encodePacked(r, s, v); } Unordered Nonce Management in SignatureTransfer
SignatureTransfer uses a sophisticated bitmap-based nonce system that allows signatures to be used in any order:
// Nonces are 256-bit values where: // - First 248 bits = word position in the bitmap // - Last 8 bits = bit position within that word mapping(address => mapping(uint256 => uint256)) public nonceBitmap; function bitmapPositions(uint256 nonce) private pure returns (uint256 wordPos, uint256 bitPos) { wordPos = uint248(nonce >> 8); // First 248 bits bitPos = uint8(nonce); // Last 8 bits } // Project teams can invalidate specific nonces using a bitmask function invalidateUnorderedNonces(uint256 wordPos, uint256 mask) external { nonceBitmap[msg.sender][wordPos] |= mask; } This system provides incredible flexibility - project teams can:
- Use signatures in any order
- Invalidate specific ranges of nonces
- Generate nonces with custom strategies
Batch Operations: Maximum Efficiency
Both systems support batching to minimize gas costs and enable complex operations:
AllowanceTransfer Batch
// Project team grants permissions for multiple token bounty pools in one transaction IAllowanceTransfer.PermitBatch memory batchPermit = IAllowanceTransfer.PermitBatch({ details: [ IAllowanceTransfer.PermitDetails({ token: address(USDC), amount: 10000 * 10**6, expiration: block.timestamp + 30 days, nonce: getCurrentNonce(projectTeam, USDC, address(this)) }), IAllowanceTransfer.PermitDetails({ token: address(DAI), amount: 5000 * 10**18, expiration: block.timestamp + 30 days, nonce: getCurrentNonce(projectTeam, DAI, address(this)) }) ], spender: address(this), sigDeadline: block.timestamp + 1 hours }); // Single signature grants permissions for multiple token bounty pools permit2.permit(projectTeam, batchPermit, signature); SignatureTransfer Batch
// Project team authorizes bounty payments to multiple researchers in one transaction ISignatureTransfer.PermitBatchTransferFrom memory batchPermit = ISignatureTransfer.PermitBatchTransferFrom({ permitted: [ ISignatureTransfer.TokenPermissions({token: address(USDC), amount: 5000 * 10**6}), ISignatureTransfer.TokenPermissions({token: address(DAI), amount: 3000 * 10**18}) ], nonce: generateUnorderedNonce(), deadline: block.timestamp + 1 hours }); ISignatureTransfer.SignatureTransferDetails[] memory transferDetails = [ ISignatureTransfer.SignatureTransferDetails({to: researcherA, requestedAmount: 5000 * 10**6}), ISignatureTransfer.SignatureTransferDetails({to: researcherB, requestedAmount: 3000 * 10**18}) ]; // Single signature authorizes multiple bounty payments to different researchers permit2.permitTransferFrom(batchPermit, transferDetails, projectTeam, signature); Permit2’s EIP-712 Domain Setup
Permit2 uses a carefully designed EIP-712 domain that’s consistent across all chains:
contract EIP712 is IEIP712 { bytes32 private constant _HASHED_NAME = keccak256("Permit2"); bytes32 private constant _TYPE_HASH = keccak256( "EIP712Domain(string name,uint256 chainId,address verifyingContract)" ); // Domain separator is cached but recalculated if chain ID changes (for forks) function DOMAIN_SEPARATOR() public view returns (bytes32) { return block.chainid == _CACHED_CHAIN_ID ? _CACHED_DOMAIN_SEPARATOR : _buildDomainSeparator(_TYPE_HASH, _HASHED_NAME); } function _buildDomainSeparator(bytes32 typeHash, bytes32 nameHash) private view returns (bytes32) { return keccak256(abi.encode(typeHash, nameHash, block.chainid, address(this))); } } This setup ensures:
- Cross-chain consistency: Same permit2 address and domain on all chains
- Fork protection: Domain separator updates automatically on chain forks
- Version compatibility: Clear name and no version field for maximum compatibility
Security Considerations and Error Handling
Permit2 implements comprehensive security measures that your bug bounty platform should understand:
Time-based Protections
// All permits include deadline checks if (block.timestamp > permit.deadline) revert SignatureExpired(permit.deadline); if (block.timestamp > permitSingle.sigDeadline) revert SignatureExpired(permitSingle.sigDeadline); // AllowanceTransfer permissions can expire if (block.timestamp > allowed.expiration) revert AllowanceExpired(allowed.expiration); Amount Validations
// SignatureTransfer enforces exact amount limits if (requestedAmount > permit.permitted.amount) revert InvalidAmount(permit.permitted.amount); // AllowanceTransfer tracks and decrements balances if (amount > maxAmount) revert InsufficientAllowance(maxAmount); Nonce-based Replay Protection
// AllowanceTransfer: ordered nonces if (allowed.nonce != nonce) revert InvalidNonce(); // SignatureTransfer: bitmap-based unordered nonces function _useUnorderedNonce(address from, uint256 nonce) internal { (uint256 wordPos, uint256 bitPos) = bitmapPositions(nonce); uint256 bit = 1 << bitPos; uint256 flipped = nonceBitmap[from][wordPos] ^= bit; if (flipped & bit == 0) revert InvalidNonce(); // Nonce already used } Emergency Features
Permit2 includes emergency functions for compromised accounts:
// AllowanceTransfer: Revoke all approvals immediately IAllowanceTransfer.TokenSpenderPair[] memory revokeList = new IAllowanceTransfer.TokenSpenderPair[](2); revokeList[0] = IAllowanceTransfer.TokenSpenderPair({token: address(USDC), spender: address(bugBountyContract)}); revokeList[1] = IAllowanceTransfer.TokenSpenderPair({token: address(DAI), spender: address(bugBountyContract)}); permit2.lockdown(revokeList); // Sets allowance amounts to 0 for all specified token/spender pairs // SignatureTransfer: Invalidate ranges of nonces permit2.invalidateUnorderedNonces(wordPos, mask); // Invalidates specific nonces using bitmap Gas Efficiency Benefits
Permit2 provides significant gas savings for your bug bounty platform by reducing transaction overhead and enabling batch operations:
Traditional Approach vs Permit2
// Traditional: Two separate transactions required // Transaction 1: Project team approves contract (gas cost varies by token) USDC.approve(bugBountyContract, amount); // Transaction 2: Contract processes bounty payment bugBountyContract.claimBounty(bugId, amount
            See more
Table test
| You can | create a | simple table | like this. |
|---|---|---|---|
| an image | <p> </p> </p> |
extends the table | vertically. |
| A pipe | extends the table | laterally. |
Configure Exocore for Personal Use
Change your Username and Homepage
Navigate to /exocore/data/user.yml. Open the file in any text-editor (e.g. Notepad or TextEdit) and look for user_name: Remilia Corporation. Change this to whatever name you want to appear on the left sidebar.
Change your Homepage Content
In the same /exocore/data/user.yml file, you will also see welcome_header and welcome_subtitle. These control the title and subtitle that appear on your homepage.
On the root folder you will find index.md, this can be edited like any other article as your homepage with the addition of the title and header from the user.yml file. Make sure you keep the following frontmatter at the top of the markdown file:
---
layout: home
title: home
---
Change your Profile Picture
The profile picture that appears on the left sidebar is located at assets/img/pfp.png, you can replace this file with any .png. Note that it will be resized into a square.
Change your Social Media Card Image
The social media card that appears when your site is linked on social media sites like Twitter, Facebook, etc. is located at assets/img/card.png, you can replace this file with any .png. Note that a dimension of 1200x630 is recommended.
Make sure the site’s url is changed in /_config.yml in the next step for this image to appear.
Change your Site’s Title and URL
Navigate to /_config.yml to change the Title and URL of your exocore. All other settings can be left as is.
Change the Theme
The Exocore ships with multiple themes to choose from. Navigate to /styles.scss and look for the line that says //Uncomment one of the following lines to choose a theme:. To select a theme, remove // from the line of the theme you want to try, and add // to the previously active theme (“yotsuba” by default).
Optional: Password Protection
You can add simple password protection by going to your Netlify account, entering your site, going to Settings > Build & Deploy > Build Settings > Edit Settings and changing Build commannd from the default bundle exec jekyll build to:
jekyll build && npx staticrypt _site/index.html P@SSW0RD -o _site/index.html
This will password protect the homepage with P@SSWORD as the password – you can change this to anything you’d like. Note that this will only protect the homepage, users will be able to directly link to any other page and have access to the whole site.
Move on to using your exocore for further guidance.
Interlinked Pages
Jade post
Cyber Asiatic Mystic Synthesis Return Eastern Technomarket Hegemon… Jade McDonalds Sun Poem… Pacific Ocean Disappear… (30 billion Eagles XxX 991hz) Platinum Prison Duplication Facility… Astral Screen-Cheating Marble Moon Wire Theft. Jade Dragon Million Sex Control Dollars Professional Power. Luxury Million Yen Diamond Power (Exit Enclave) POLICE STATE BATH HOUSE™ Holding Corporation. Yin Massage Hot Egg…
Interlinked Pages
Exocore Installation Instructions
You can set up a personal website as a public exocortex with no code in this 15 minute guide, using entirely free services to host your site on the web.
All pages are converted from simple, non-code Markdown syntax, so you can focus purely on writing. The end result will look identical to this page.
Background
Github will be used as a cloud content management system - it’s convenient to upload updates to, accessible and editable from anywhere, and keeps full version history of changes as well as provides easy options for back-up.
Netlify will be used to deploy the files stored on Github as a web-server - it’s fast and automatically updates whenever an update is made on your Github repository. Github does offer its own static webhost, but Netlify is necessary due to certain plugin support limitations.
Netlify will also provide your site a custom subdomain, e.g. [site-name].netlify.app. You can also use your own purchased domain.
All services are entirely free besides the custom domain.
Deploy your own Exocore to the Web
Create Github Account
First, create an account on github.com if you do not already have one. Remember to make your email private in settings.
Continue below when you have an account ready.
Install the Exocore template to GitHub and Netlify
Open our One-click installation.
Steps:
- Select
Connect to Github - Login to Github and select
Authorize Application - Name your repository - this is your own reference
- Select
Deploy site
Netlify will now take about 5 minutes for the initial build of the site. If you want, you can watch the status of the build by clicking Production: master@HEAD under Production Deploys.
Once it’s complete, the Production status will change to Published, and you will be able to click the [site-name].netlify.app link to see your site.
The site’s master files will also appear in your Github account, under the repository name you selected, e.g. github.com/account-name/repository-name. Changes here will go live on the site automatically.
Your site is now officially live, available for anyone to view at [site-name].netlify.app., but there are some settings we should adjust before moving forward.
Change your site name
Change the default generated site name to whatever you’d like by navigating to Site settings > Site details > Change site name. It will be available at [sitename].netlify.app
Optionally, you can find instructions for setting up a custom domain [[here|custom domain]].
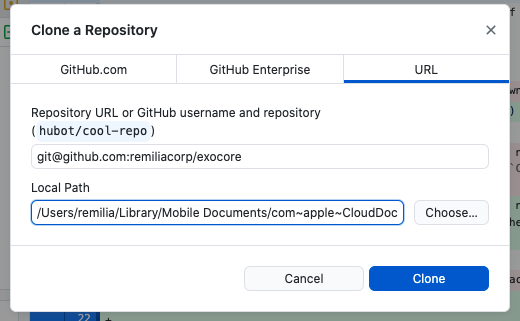
Clone your repo and set to ssh
First, download Github Desktop if you don’t already have it.
Open the program and follow the instructions to sign in to your Github account then click Current Repository at the top left, then Add > Clone Repository...
Now enter git@github.com:yourusername/reponame.git replacing your github username and repo name, e.g. git@github.com:remiliacorp/exocore.git, and where you want to store your exocore (if you want to edit on mobile this will need to be on a cloud drive like iCloud, see [Exocore Installation Instructions#Optional Setup Mobile Editing|7. Setup Mobile Editing])
Change repo to ssh
If you’ve already cloned your repo before, you’ll need to make sure it’s set to ssh, not https. If you haven’t, continue onto Setup SSH with Github
Navigate to the repo on Github Desktop, then click Repository > Repository Settings in the menu bar.
If the Primary remote repository (origin) begins with git@github.com: you’re on ssh already and don’t need to do anything. If it begins with https://github.com/ simply replace that excerpt with git@github.com:.
eg https://github.com/remiliacorp/exocore.git becomes git@github.com:remiliacorp/exocore.git
Setup SSH with Github
If you don’t already have an SSH Key, you’ll need to make one to add to Github. If you do move directly to [[Using Exocore on Obsidian#Add SSH Public Key to your Github|Add SSH Public Key to your Github]]. If you’re not sure, you can run ls -al ~/.ssh in Terminal to check, if you see id_rsa and id_rsa.pub you can continue to [[Using Exocore on Obsidian#Add SSH Public Key to your Github|Add SSH Public Key to your Github]].
Generate SSH Key
-
Open Terminal on OSX or Linux (Git Bash on Windows).
-
Paste the text below, substituting in your GitHub email address:
ssh-keygen -t rsa -b 4096 -C "your_email@example.com"
This creates a new SSH key, using the provided email as a label.
> Generating public/private algorithm key pair.
-
When you’re prompted to “Enter a file in which to save the key,” press Enter. This accepts the default file location.
Enter a file in which to save the key (/Users/you/.ssh/id_rsa): [Press enter] -
At the prompt, type a password that you’ll remember.
Enter passphrase (empty for no passphrase): [Type a passphrase]
Enter same passphrase again: [Type passphrase again]
Add SSH Private Key to the ssh-agent
- Ensure the ssh-agent is running.
$ eval "$(ssh-agent -s)"
You will see an output that looks something like:
Agent pid XXXXX
- Next, add your SSH private key to the ssh-agent.
ssh-add ~/.ssh/id_rsa
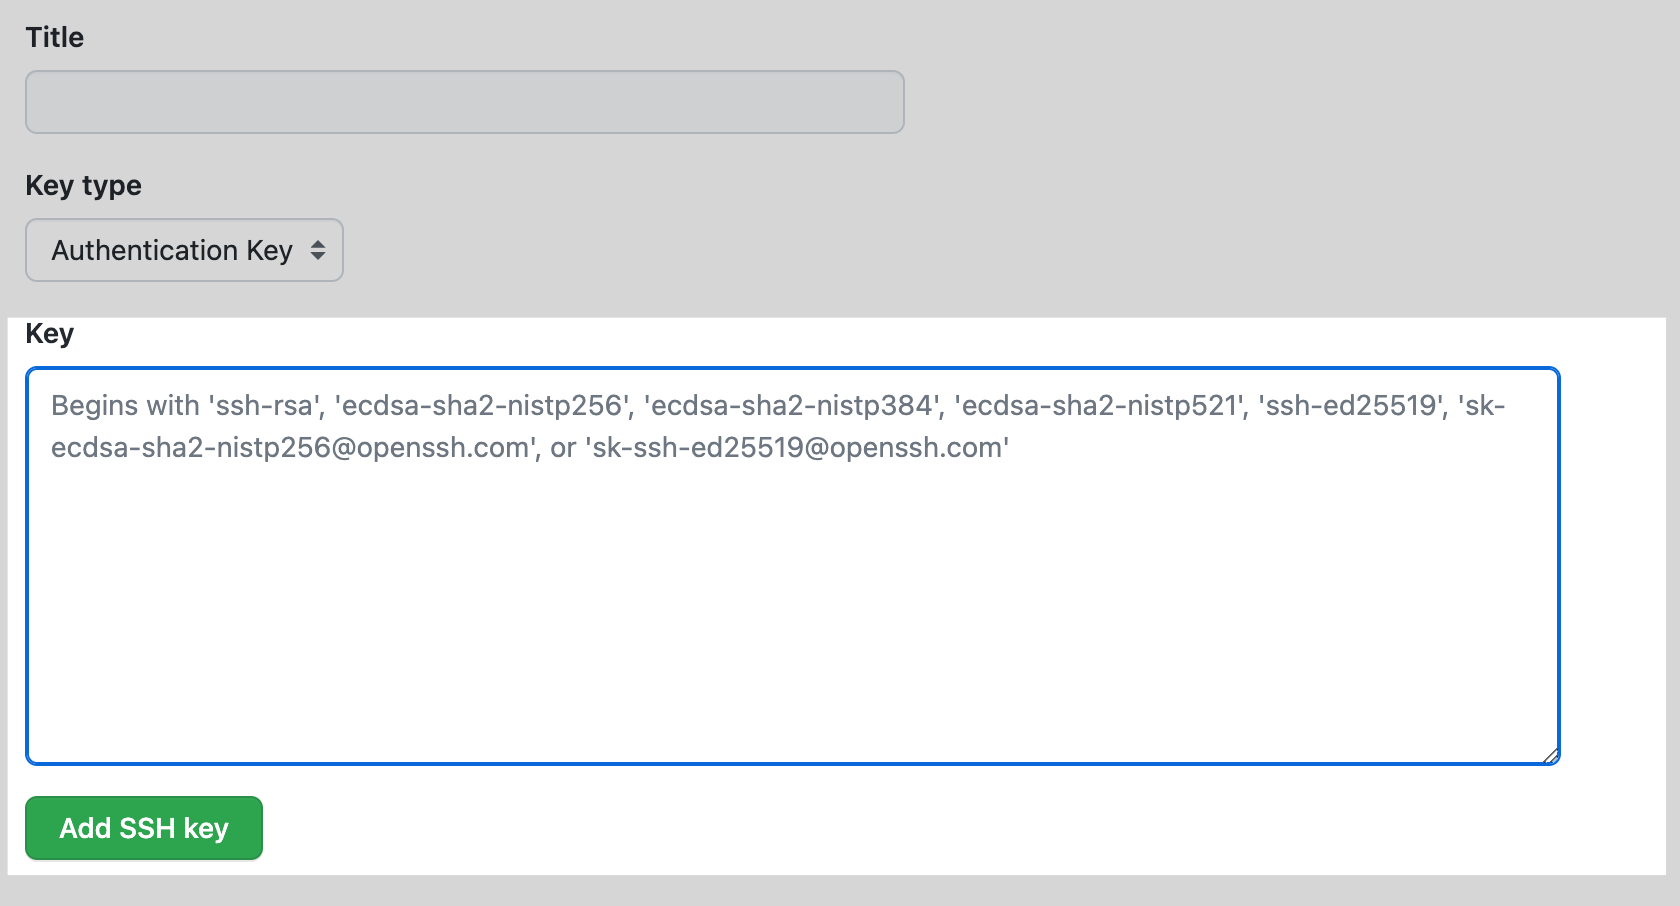
Add SSH Public Key to your Github
- Copy your SSH public key to your clipboard.
OSX/Linux: pbcopy < ~/.ssh/id_rsa.pub
Windows (Git Bash): cat ~/.ssh/id_rsa.pub | clip
- Login on Github and click your profile photo, then click Settings.

- In the “Access” section of the sidebar, click SSH and GPG keys.
- Click New SSH key or Add SSH key.

- Give it a Title. Under Key type select: Authentication.
- Past the key into the “Key” field and click add ssh key
Install and Setup Obsidian
Download Obisidian on your PC.
Select Open a Folder as a Vault and select where you saved your exocore. Click Trust authors and enable plugins.
By default, changes are saved 10 minutes after no files have been edited to prevent publishing while you’re making corrections.
You can adjust this setting by clicking the gear icon in the bottom right, then scrolling down to the bottom of the sidebar and selecting Obsidian Git:
-
Vault backup interval (minutes)- how frequently you want to changes to be saved automatically. Set to 10 minutes by default
Also relevant if you plan to be editing on mobile is Auto pull interval (minutes), how frequently you want to sync with any changes to the exocore from another source. 10 minutes is reasonable, you can set this lower if you’re frequently moving back and forth from phone to PC. Make sure to set the Vault backup interval lower too if so.
Remember that you still control what is actually publicly published on the public site with the published: true/false tag at the top of each file.
Configuring your Exocore
- Navigate to
/exocore/data/user.ymlto change your username. - Navigate to
/_config.ymlto change the Title and URL of your exocore. - Change the profile picture in the sidebar by replacing
assets/img/pfp.pngwith a square profile picture of your choice.
Each step explained in more detail with more personailzation options including changing themes at configure exocore for personal use.
Optional: Setup Mobile Editing
Obsidian has a good mobile app if you want to do mobile editing, but you’ll either need to store your Exocore on a cloud service such as iCloud or Google Drive to get the files on your phone, or pay $10/mon for Obsidian Sync. The exocore is entirely text so it is very lightweight, the standard cloud drive 5-15GB free tiers all have more than enough to storage unless you’re hosting many PDFs or large files.
You’ll need to download their respective apps to point Obsidian to them on your local drive on both PC and mobile. For example, with Google Drive, you just download Drive for Desktop and Drive for Android and login and your files will be accessible on the Obsidian apps.
Warning: For iOS, you will need to use iCloud storage, Apple doesn’t support other cloud storage solutions. If you’re familiar with git workflows, you can also sync with Git using Working Copy or iSH as an alternative to iCloud.
Using your Exocore
Continue on to using your exocore to familiarize yourself with the editor interface and begin writing new notes.
See more
Interlinked Pages
The Exocore Workflow

Interlinked Pages
Predictive Processing and the Free Energy Principle
Terms:
- Active inference
- Predictive Processing/Predictive Coding
- Free Energy Principle
- Markov Blanket
- Model of Action
Classical model of action:
- Optimal action depends on state of the world
- Therefore, first step of action is to (1) form a belief (analyse surroundings/prospects)
- (2) imagine a value function of next state brought about by action
- (3) optimise action that maximises value of the next state
Model of action
- Classical model doesn’t work when the best next thing to do is to search for/resolve uncertainty
- Optimal action depends on beliefs about the world, and subsequent action
- Further, it’s a function of the order in which you interrogate the world
- Therefore the functional (function of a function) to be optimised is a function of beliefs
- Optimal action therefore is optimising sequences or policies of actions
- To be optimised: a function of a belief, integrated over time
Free Energy Principle:
- The goal of a self-organising (eg biological) system is to minimise prediction error (surprise), also called ‘free energy’, by forming continually-updated beliefs/inferences about the world from which to form policies of action
- Friston considers this an organising principle of all life and intelligence
-
To be alive (to be a system that resists disorder and dissolution) is to act in ways that reduce the gulf between your expectations and your sensory inputs (AKA, to minimise free energy)
- If a prototypical agent, or a ‘good agent’ minimises free energy (thereby minimising ‘surprise’), they must believe that the actions they take minimised expected free energy
- expected free energy associated with a policy of action is minimised
Markov Blanket:
The Markov Blanket is a concept in machine learning which is essentially a shield that separates one set of variables from others in a layered, hierarchical system. The blanket defines the boundaries of a given system. That is, in cognition, a cognitive version of a cell membrane shielding states inside the blanket from states outside. This is the schema by which surprise is minimised— the Markov blanket is a set of variables sufficiently complete that another random variable can be inferred from it . If a Markov blanket is minimal (parsimonious) (cannot drop any variable without losing information), it is called a Markov boundary.
Interlinked Pages
Underpinnings of the Exocore
Digitally-Integrated Mind Palace
- Navigability
- Easy hyperlinking = frequent hyperlinking
- Memorability
- Hijacking and piggybacking on existing human mnemonic faculties
- Chernoff Faces
- Urbit Sigils
- Urbit Names
- Spatial faculties — does an implementation exist?
- Zettelkasten mnemonic badges
- Hijacking and piggybacking on existing human mnemonic faculties
Semantic Internet
- Plain text
- Accessibility
- Universality
- Standards-compliance
- Portability
- Static Website Delivery
Writing as Thinking, Written Output as Consolidated Thought
- Feynman Technique
- General —> specific, scattered -> polished
Data Ownership and Escaping Net Serfdom
- Digital owned space
- Customisability
- Local Instance
- Digital and Personal Legacy
FOSS
- The Viral Public License
- Non-proprietary (open source) file formats
Network Sublimation
- Collaboration
- Webrings
- RSS
- Remchat
- The New Internet
Frictionlessness
- Local storage
- No internet required
- No coding required
- Searchability — in contention with static design
Tradition of the Exocore
- The Roman Room
- The Memex
- The Zettelkasten
- Project Xanadu
- Web 1.0
- IRC
- Webrings
- Digital Gardens
Related Concepts and Projects:
- Project Xanadu
- Memex
- Compendium
- Zettelkasten
- Hyperdraft
Other Exocore-like implementations and resources
- New Computer Working Group — Are.na
- XXIIVV — about
- Webring
- XXIIVV — horaire
- É. Urcades
- cybernetics-club/session-1.md at master · learning-gardens/cybernetics-club · GitHub
- Lukasa (Luba) - Wikipedia
- wikipedia.org/wiki/Memex
- V · V-OS
- Augmenting Long-term Memory
- Building the Memex Sixty Years Later: Trends and Directions in Personal Knowledge Bases
- planet - Une collection d’outils pour construire ma page personnelle
- Digital garden
- Hyperdraft
- Hrǽw
- cybernetics-club/resources.md at master · learning-gardens/cybernetics-club · GitHub
Visual data representations that piggyback on human mnemonic faculties
Chernoff Faces
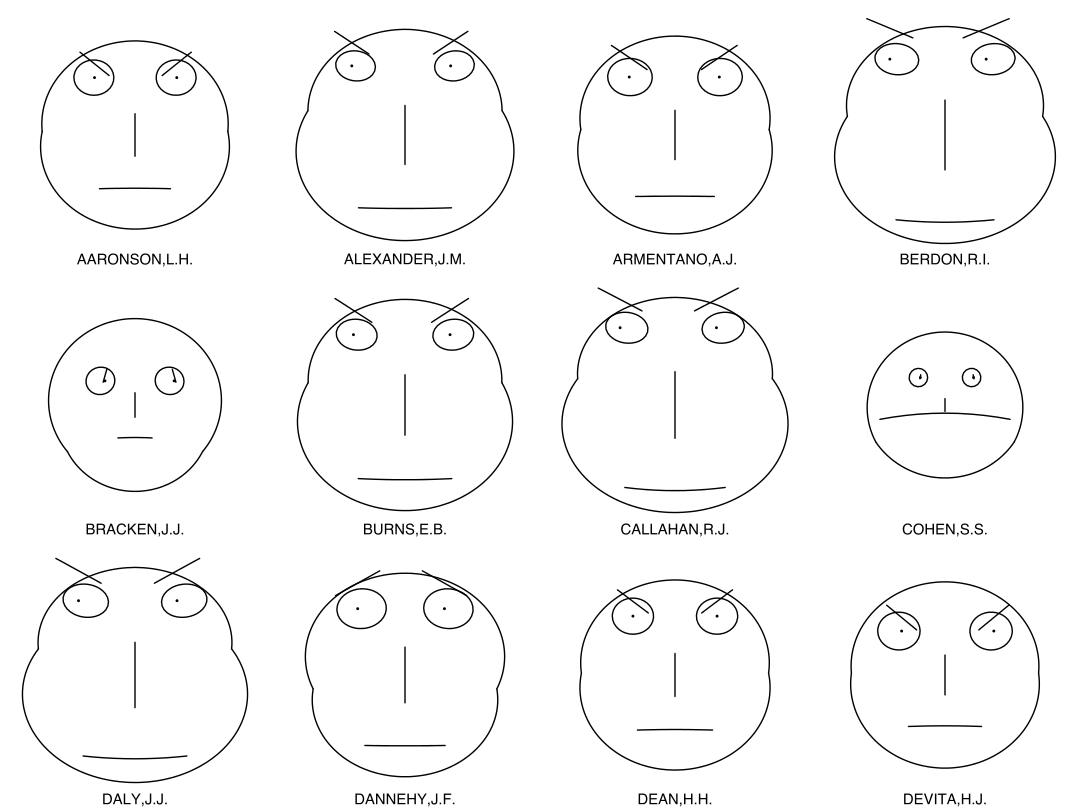
“Chernoff faces, invented by applied mathematician, statistician and physicist Herman Chernoff in 1973, display multivariate data in the shape of a human face. The individual parts, such as eyes, ears, mouth and nose represent values of the variables by their shape, size, placement and orientation.”
Urbit Sigils

Urbit Names
    Prefixes   Suffixes
    ---------- ----------
0.    doz        zod
1.    mar        nec
2.    bin        bud
3.    wan        wes
4.    sam        sev
5.    lit        per
6.    sig        sut
7.    hid        let
8.    fid        ful
9.    lis        pen
10.   sog        syt
11.   dir        dur
12.   wac        wep
13.   sab        ser
14.   wis        wyl
15.   sib        sun
Example:
  8 bits  galaxy  ~lyt
 16 bits  star    ~diglyt
 32 bits  planet  ~picder-ragsyt
 64 bits  moon    ~diglyt-diglyt-picder-ragsyt
128 bits  comet   ~racmus-mollen-fallyt-linpex--watres-sibbur-modlux-rinmex
Roman Room/Memory Palace/Method of Loci
The Lukasa

“Court historians known as bana balute (“men of memory”) run their fingertips across the surface of a lukasa or point to its features while reciting genealogies, king lists, maps of protocol, migration stories, and the great Luba Epic, a preeminent oral narrative that records how the culture heroes, Mbidi Kiluwe and his son Kalala Ilunga, introduced royal political practices and etiquette. “
Interlinked Pages
Set up a Custom Domain
Custom domains can be added for a better look and more memorable url, but you will need to purchase one. If you already have a domain, follow the steps in Configuring a Domain Purchased Elsewhere
Purchase Domain on Netlify
If you do not already have a domain, you can purchase it directly within Netlify by adding in a new Custom domain. Prices aren’t the best on the market (e.g. .com is $15/yr, market rate is $12/yr), but it will automate all setup.
- Navigate to Settings > Domain Management > Add custom domain.
- Enter the domain you would like
- If it is unavailable, you will see
[domain] already has an owner. Is it you?. SelectNo, try another. - If you find one that is available, you will be provided prices and option to register. You can use a Domain search tool to help find available domains.
Once you have a domain purchased, Netlify will automate handling DNS configuration and SSL encryption, so your site will be fully ready to go on your domain.
Purchasing a Custom Domain
Domains can be purchased from a variety of suppliers for affordable rates - a .com domain goes for about $12/year, though uncommon domains like .xyz can be found for as low as $2/year.
I can recommend Google Domains, I use it because it includes privacy protection and custom email aliases for free, and has an easy to navigate dashboard, as well as Google’s very fast DNS.
For uncommon domains and more competitive prices, Namecheap is reliable - it also has a solid “Beast mode” search for finding rare domains.
Configuring a Domain Purchased Elsewhere
If you purchase your domain elsewhere, you will need to configure your domain provider to point the domain to your Netlify site. Follow this guide: Configure external DNS for a custom domain.
The steps on your domain provider’s end will be different depending on your provider, look for something along the lines of “Create A or CNAME Record”, “Point DNS to Domain” or “Manage DNS Records”.
Then add the custom domain in Netlify:
- Navigate to Settings > Domain Management > Add custom domain.
- Enter the domain you would like
[domain] already has an owner. Is it you?. SelectNo, try another. - If you find one that is available, you will see
- Select Yes, add domain
SSL (https) will be configured automatically.
Using your Exocore
Now that you’ve installed your exocore this guide will walk you through navigating it in practice. Read a more detailed explanation of the Exocore’s present and future functionality here.
Launch your Exocore
Open the root folder of your Exocore in VS Code to launch your editing interface.
Creating new posts
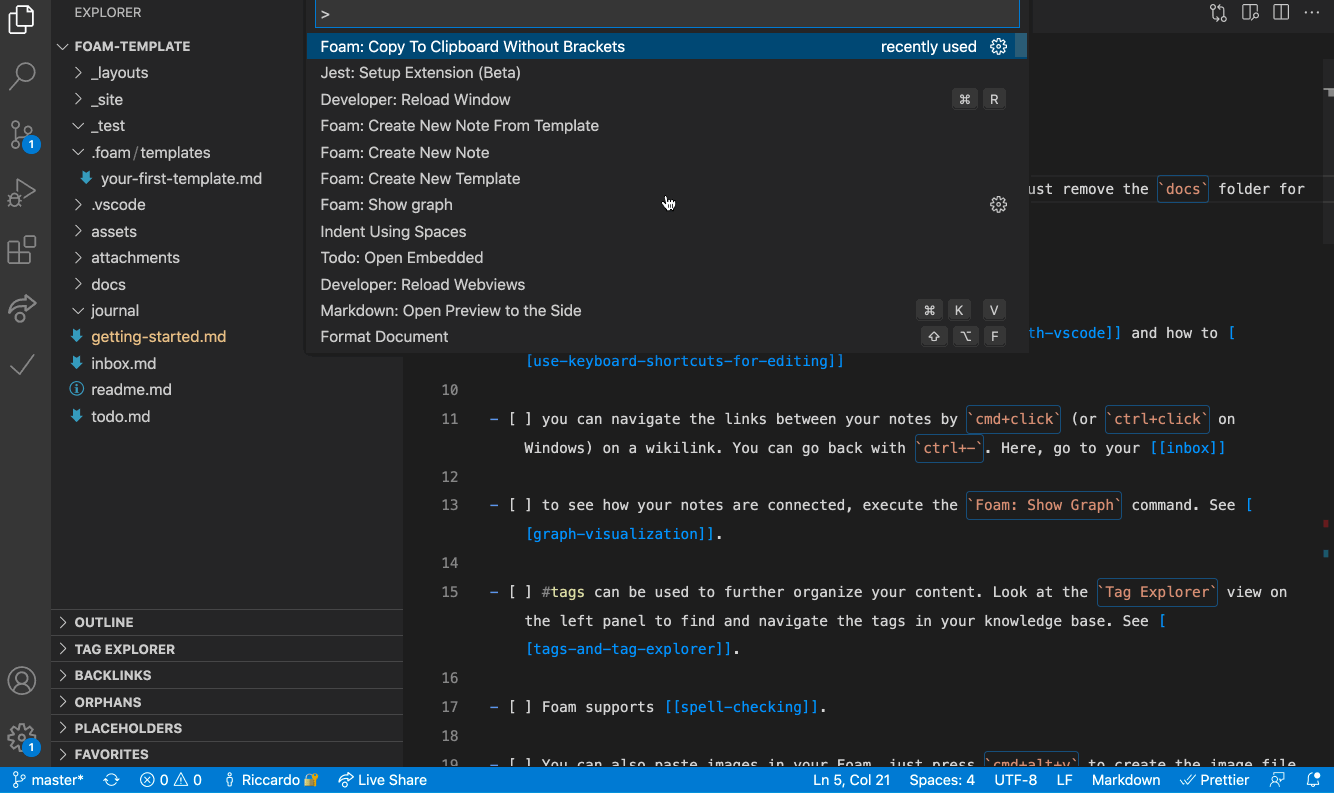
Use keyboard command Ctrl + P (Cmd + P on OSX) to summon the command panel. From here you can access a variety of functions by beginning to type their names. Start typing ‘create new note from template’ to find the options for creating new posts.
- Daily Notes are designed as a quick access scratch pad, and are perfect for low-specificity research dumps and fleeting notes that will inform your notes in future. These are automatically titled by date. One is created each day automatically, and opened when you open VSCode.
- Wiki Notes are designed for single atomic data points, and are automatically titled with a hexadecimal color code. This code is turned into a correspondingly colored badge in the index of the published site.
- Journal Entries are for your thoughts, and are not automatically titled.
- Articles are for longer write-ups on a particular topic.
You may have noticed that these notes together create a pipeline for systematising knowledge over time from the general to the particular, and for capturing a bank of scattered reference material and developing it into a polished final product. You might choose to cite a research dump in the subsequent post that it turned into as a bibliography/further reading section, such as appears at the bottom of this wiki note.
As you develop an idea, you may see it go through each stage of note until finally culminating in a well-researched article. Notes can even be embedded in full within other notes, explained in writing with exocore syntax
Using Metadata
If you followed the above instructions to create a new post, you will notice that it spawned with a YAML metadata section at the top.
This metadata does not appear in the text of the post, but affects how the post will be treated when your Exocore is rendered into a website. The metadata of the post you are currently reading looks like this:
---
layout: article
category: article
subtitle:
topic: meta
date: 2022-04-13
tags: meta computers exocore
---
If you’re using a browser to read this, you won’t see this information at the top of the post, but the Exocore has incorporated it already into the way it treats the post. It has dated the post, sorted it into the ‘Articles’ section of the site, and given it tags which appear in the left sidebar. You can add to the topic and tags sections, backdate your post, or add a subtitle if you wish.
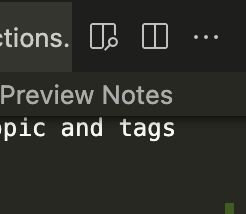
Preview Notes
Your notes can be previewed in rendered markdown by clicking the glass icon on the top right of the window. You can navigate between linked notes from within this previewed window.
Split Windows
Obsidian: Ctrl+Click (OSX: CMD+Click) on a note can be used to create a new window split. Ctrl+W (OSX: CMD+W) can be used to close them. VSCODE: Ctrl+\ (OSX: Cmd+) can be used to create a new window split. Ctrl+W (OSX: CMD+W) can be used to close them.
Graph Visualization
See how your notes are connected via a graph by opening the command panel with ctrl+P (OSX: CMD+P) then entering Graph view: Open graph view(OBSIDIAN) / Foam: Show Graph (VSCODE). Notes can be clicked through to navigate your exocore this way.
Markdown Syntax
Continue on to Writing with Exocore Syntax to learn the Markdown syntax standards it follows, as well as its extensions for hyperlinks, embedded code, footnotes and more.
Interlinked Pages
2022-05-11
1TB Geocities Torrent, Web 1.0 homepages
- One Terabyte of Kilobyte Age - Digging through the Geocities Torrent
- Justin’s Links from the Underground
- Stuart Frankel’s very small web site
- about:jwz
- eric li
- i choose - The Answers are always inside of you
- djoshcook
- The Distributed Web, and the Browser I Wrote to Surf It (Beaker Browser Demo) - YouTube
Other Exocore-like implementations and resources
- New Computer Working Group — Are.na
- XXIIVV — about
- Webring
- XXIIVV — horaire
- É. Urcades
- cybernetics-club/session-1.md at master · learning-gardens/cybernetics-club · GitHub
- Lukasa (Luba) - Wikipedia
- wikipedia.org/wiki/Memex
- V · V-OS
- Augmenting Long-term Memory
- Building the Memex Sixty Years Later: Trends and Directions in Personal Knowledge Bases
- planet - Une collection d’outils pour construire ma page personnelle
- Digital garden
- Hyperdraft
- Hrǽw
- cybernetics-club/resources.md at master · learning-gardens/cybernetics-club · GitHub
The DevTerm
Exocore theme assets


Usufruct
Usufruct is a legal concept referring to a right in property which confers on the holder the right to use and benefit from the property without altering, damaging, or destroying it. A usufructary does not own the property but does have a legal interest in it which is sanctioned or contractually allowed by the owner.
A usufructary has two of the three civilian property property interests in the property, usus and fructus— they do not have the interest of abusus, which entitles them to alienate, destroy, consume or sell the property.
The three civilian property interests:
- Usus: The right to use or enjoy a thing posessed, directly and without alteration
- Fructus: The right to derive profit from a thing possessed, eg. by lease, cultivation, taxing on entry, etc. Fructus (from ‘fruit’) allows a person to benefit from the sale of renewable commodities of the property.
- Abusus: The right to consume, destroy, or transfer the property. This interest is not conferred upon the usufructary.
Notes:
- Roman law considered usufruct a type of personal servitude, where the usufructary had no posession of the property. Under a rental agreement today, a person has even more restricted rights over a property than did a usufructary in Rome, but is yet not considered a personal servant.
- The Law of Modes directed owners of productive property not to harvest the edges of their fields so that the poor may collect the gleanings. This confers a kind of usufructary right by default onto the poor.
- “Earth belongs – in usufruct – to the living.” (Thomas Jefferson).
L-Dopa
Dopamine, L-dopa and Pattern Detection
Production of neurotransmitter dopamine is stimulated by novelty, and it facilitates learning, information storage and pattern-recognition, as well as regulating emotion. Pattern-detection is important to learning, because the brain is able to compress complex raw data by identifying repetitious elements and storing information in association with the pattern, rather than making space for each node of information to be stored separately. For example, there is no need to memorize 1000 string of digits in order to count from 1 to 1000; the pattern is regular enough that the brain can derive each integer from a pattern it has stored, without storing each data point that the pattern produces.
However, patterns are not pure representations of the world, or even of the data being apprehended by the brain— they are mnemonic data structures which necessarily reduce the complexity of information in order to store it more efficiently. Pattern-matching is generally considered to be helpful for learning, and this may be true, provided that ‘learning’ in this context has the same meaning as ‘remembering’, or ‘committing to memory’.
However, is learning-as-remembering actually conducive to understanding? ‘Sensitivity to pattern-detection’ can be alternately phrased as ‘tendency to apply narrative’. Humans cannot resist but apply narrative to phenomena, and it seems that a compulsion to apprehend data in a logical or causal sequence is deeply ingrained in the human brain, ported over from a form of intelligence that evolved to understand the physical world, where causality is a ubiquitous feature. For this reason, making judgements on inert data is a human default, and takes serious conscious effort to avoid.
It is therefore unsurprising that dopamine also lowers skepticism. If logical sequences (patterns) appear more readily, an inflated subset of chaotic phenomena appears to ‘make sense’, and so the suspension of belief is more easily overcome. L-dopa, a drug which is metabolized as dopamine and used to treat Parkinson’s, makes people more vulnerable to pattern-detection, and has a notable side-effect that causes some patients to develop sudden gambling additions— patients see clear patterns in random phenomena, leading them to believe they will be more successful than they will be in reality.
Summary: Pattern detection is conducive to memorization, but not necessarily to clear thinking; in many instances apprehension of a pattern is a reduction of phenomena too complex to be faithfully reduced. Heightened dopamine can bolster addictive compulsions and increase credulousness, as patterns are more readily detected and chaotic sequences of action appear to make more sense. Pattern-detection is enhanced by dopamine production, and tendencies to compulsive action can result.
Samgyetang Ginseng Chicken Soup (Korean Style)
For one serving:
- Cornish hen/spatchcock
- quarter cup (ideally short grain) rice, soaked for 15 minutes in hot water
- Ginseng root
- large dried jujube (red date)
- 8 garlic cloves
- Spring onions, chopped
- Salt
- Ground black pepper
Prepare:
- Wash and salt hen, and rinse rice with cold water
- Stuff with rice, 1 ginseng root, 1 jujube, 8 cloves of garlic
- Boil from cold water, then simmer for 1.5 hours
- Occasionally ladle any settled broth over hens
- Serve Hens whole in a bowl and pour over broth
-
Sprinkle spring onions and pepper
Compare with chinese ginseng chicken tonic soup

Interlinked Pages
Writing with Exocore Syntax
Markdown Basics
The Exocore utilizes standardized Markdown syntax, along with some additional extensions. Much of the content of this article covers existing markdown syntax used universally in plain text formatting. However, some syntax, such as wikilinks and images are particular to the Exocore.
Headers
The above is a level 2 heading, preceded by ## and a space.
There’s nothing special about the way the Exocore processes headers— it’s just standard markdown. However, each header will render with an anchor link. If you hover over a heading and click the link icon that appears, the URL in your browser will reflect the section that you clicked. Now, if you copy that URL it will link directly to the heading that you clicked.
Heading levels
The above is a level 3 heading, preceded by ### and a space.
Here’s some advice: Only use top-level headings (preceded by #) for the document’s title. Aside from being markdown best practice, the Exocore takes your first top-level heading to use as the title of the page in the final rendered output. For intra-document section titles, use a level 2 heading. It’s for the best.
Examples of Wikilinks:
Here is a basic wikilink, pointing to other posts on this Exocore: <a class="wiki-link" href="/articles/exocore-executive-summary">exocore executive summary</a> It renders like this: exocore executive summary.
It is written as the title of their corresponding markdown file, surrounded by double square brackets. However, in the final render they are presented by default as the page’s title. This saves you typing out the whole page title in your markdown document, and allows the Foam VSCode extension to suggest files as you type. Below you can read about how to change their presentation.
You can alias a link like this: <a class="wiki-link" href="/journal/chinese-ginseng-chicken-tonic-soup">this link</a> if you don’t want to keep the title. Heads up— <a class="wiki-link" href="/journal/chinese-ginseng-chicken-tonic-soup">This link</a> points to a recipe for Chinese ginseng chicken Soup.
You can also point to headers within a page: <a class="wiki-link" href="/articles/writing-with-exocore-syntax#wikilink-embeds">This wikilink</a>. This wikilink points to a header further down on this page, by using a #. Under that header you will find a different sort of wikilink— an embed. The content of another note is embedded within the current note. You can also point to a particular header within another note.
Check out the backlinks section at the bottom of any post, and you’ll find a list of every post that links back to it. Backlinks are automatically generated, and display all posts with links pointing to them.
Wikilink Embeds
The below text is embedded, using the same wikilink syntax as normal, but with an ! prepended. The full text of the linked note will be included. For example, here is an example of embedded note syntax:
External Hyperlinks
Hyperlinks to external sites are not the same as wikilinks. A wikilink is a simple way to hyperlink to other posts on your Exocore without using the full processed URL as it is rendered online. A wikilink works locally in VSCode, allowing you to navigate between posts, and is transformed at render time to a web hyperlink, so that it always points to the correct page.
To create a hyperlink, use single normal parentheses around the URL you want to point to, and square brackets around the text you want displayed:
https://en.wikipedia.org/wiki/Parenthesis
[https://en.wikipedia.org/wiki/Parenthesis](https://en.wikipedia.org/wiki/Parenthesis)
You can alias a hyperlink by changing the text in the square brackets, like this:
Here’s some information about Hyperlinks.
[Here's some information about Hyperlinks.](https://en.wikipedia.org/wiki/Hyperlink)
Applying classes to a paragraph or image
Oh, by the way: You can apply the {:.right-aside} class to create an aside, like this one. An aside floats to one side and other text wraps around it. {:.left-aside} is also available for some variety.
Kramdown, the Markdown parser used by this implementation of the Exocore, has the ability to apply a CSS class to a paragraph by including syntax like {:.classname} at the top or bottom of a paragraph. The class will be applied to the whole paragraph. The Exocore stylesheet includes a few general classes meant to be used for just this purpose, which you should feel free to add to.
The following classes are pre-defined in the Exocore stylesheet:
-
{:.center}— Reduces width of paragraph and centers it for emphasis -
{:.left-aside},{:.right-aside}— Applies a border and floats to the left/right. Other text will wrap around it -
{:.left},{:.right}- Reduces width and places to the left/right (meant for images) -
{:.border}- applies a thin border -
{:.shadow}- applies a dark blurred drop shadow -
{:.glow}- applies a bright blurred drop shadow (produces a glowing effect) -
{:.flip}- flips the image (or text) horizontally
Tables
| You can           | create a          | simple table      | like this.     |
| ----------------- | ----------------- | ----------------- | -------------- |
| A new line        | in markdown       | extends the table | vertically.    |
| A pipe            | extends the table | laterally.        |                |
| You can | create a | simple table | like this. |
|---|---|---|---|
| A new line | in markdown | extends the table | vertically. |
| A pipe | extends the table | laterally. |
For more options, check out the ‘advanced tables’ plugin in the sidebar. This plugin will assist you with spacing and syntax, and includes a powerful formula function, about which you can find information here.
Graphviz
For more complex data representation, Graphviz can be used in conjunction with the Exocore. Read more about Graphviz syntax here, and find a demonstration of the way it is used with the Exocore here.
Sidenotes and Footnotes:
Footnotes are done with [^1], and look like this: 1 Each footnote is an anchor link to the bottom of the page, with a return link attached. Notice the sidenote in the right margin, identical to the footnote.
All footnotes are also rendered as sidenotes. A footnote forms a commentary or citation best kept separate from the main text, and a sidenote is an easy way for a reader to access such commentary without breaking ergonomy by jumping up and down the page.
If you want to add multi-paragraph footnotes, indent your second paragraph, like this (see footnote at bottom).2
[^2]: For longer footnotes, you may want to use multiple paragraphs.

    Indent paragraphs to include them in the footnote.
You can put a footnote’s markdown reference immediately under a paragraph, like this3, or clump them at the end. Either way, they will appear at the bottom in your rendered content.
[^3]: This footnote appears immediately underneath its referring paragraph in this document's original markdown, but on the rendered website it shows at the bottom.
Footnotes automatically form a numbered list, and can also be mapped by name, like this: [^named-footnote]4
Inserting images
To insert an image, use the following syntax:

However, don’t bother remembering this syntax. the easiest way to insert an image is to use the Paste Image VSCode extension, included in Obsidian by default, which you will be prompted to download as a recommended third-party extension of the Foam VSCode extension. For MacOS, copy your image to the clipboard, and use keyboard command CMD + option + V. You will be prompted to give your image file a name, and add it to the images folder in your Exocore’s top-level directory. Note: If you CMD+C copy an image from your desktop on a mac, it is not copied to your clipboard. Instead, open the image, and then use the same keyboard command.
You can insert alt text and a caption like this:

*Insert a caption by placing italicised text immediately underneath the image*
The above snippet produces the below outcome:
 Insert a caption by placing italicised text immediately underneath the image, with no empty line in between.
Embedded Code
To embed a piece of code so that characters are rendered verbatim, surround the code snippet with ``` on either side, like so:
#!/bin/zsh
cd ~/desktop/james-liao && bundle exec jekyll serve --baseurl ''
Use just one ` to embed code in the same line as the rest of your text.
Naming files
Don’t use whitespace in your filenames— instead, name-them-like-this. This way, titles are easily converted to URLs and the back end of the Exocore remains happy. This of course applies only to filenames, and you may title your posts how you wish.
That should be everything to get you started!
-
This is the first footnote. Note the return button: ↲
-
For longer footnotes, you may want to use multiple paragraphs.
Indent paragraphs to include them in the footnote. ↲
-
This footnote appears immediately underneath its referring paragraph in this document’s original markdown, but on the rendered website it shows at the bottom. ↲
-
This footnote has the name ‘named-footnote’. it’s still numbered and appears in sequence the same way the others do, but naming it might help you manage a document with many footnotes when dealing with your local markdown. ↲
See more
Ginseng Chicken Tonic Soup (Chinese Style)
10 min preparation, 1-4 hrs cooking
Spices:
- Huang Jing (Siberian Solomon’s Seal)
- Cosmic Qi, Yang power, tonifies all Three Treasures. Makes the body light and clears the eyes.
- Goji Berry (Fructus Lycii)
- Vision, liver and kidneys, neuroprotective
- Dang Shen (Codonopsis pilosula)
- Enhance Qi and improve digestion, nourish blood, tonify lungs, boost vitality.
- Chinese Yam
- Ginseng Root
- Manifold benefits
- (Huang Qi) Astragalia
These can usually be found in a Chinese grocer as a single mix, but buying each separate and in bulk avoids packing markup— you can store a giant glass jar of this for years, cheaply, and only have to buy fresh chicken.
Any kind of chicken is fine, but chicken with bones, like a Maryland or a whole spatchcock (small chicken) works best.
Prepare:
- Rinse, dry and salt chicken. Let sit for 30 minutes.
- Place herbs, water and chicken in a pot and bring to a boil, then reduce to simmer.
- Occasionally check in to remove solids from surface of soup or add water if needed.
- Cook for 1-4 hrs — 50% reduction is ideal.
- Remove chicken and chop to serving size. Season soup with salt and serve in a bowl.
Compare with korean ginseng chicken soup

Notes on Remilia’s New Internet
the vision
um um u um uh hhhhhh
the visionis the new internet
the visiton is . remco
the new internet is realtim e( meguca) (s0machat )
the new art is remilia ( milady ) *( bonkler)
this is what. I beleive in . when I said Ibelieve in the vision
spider im so drunk incoehrent righr t now you will have to forgive m e for mty terseness
the new internet is digial dovertnty . exocore. realtime chat. OpenBSD
tiling window manager .terminal .
the new internet is network spirituality
“It is Okay CCCCAA I just Saw this as an Opportunity to get your drunk answer, I’ll ask again when you’re sober.”
the new internet
haha
I understand
it all made sense to me
right now . is like a drea m for me. im rdreaming
the new internet is a reevaluation of our social interaction with each other . and a reformation of our dynamic with each other as USERS
the new internet is whit e hearted ( light hearted)
you have to think about this ,.
the real time chat BSD exocore digital sogivern homestead terminal tiling window manger are the aestehtic surface level
the deeper level is the metaphyiscs of the internet and how we interpret the virtual world
the rleationship betwene user interfaces with our mental spatiotemporal matrix of virtual reality
the relationship of social interfaces with our sociocultural development
digital culture is in turmoil as ou r third spaces are full y owned by pltaforfmrsd . w e are fully plugged in to .
eletronic womb . fetus . umbilical cord (100GB ETHERNET ) Into the SPINE
next stage o f humanutiy . traditionalism ( VAT) (susptended . sensory deperevation) / ( retrun)
3 monitors
112wsx . socio temporal nexus
cxomputer hell
the user interface will stop existing once the machine learning models fully understand us
the syncreticism between the old and the young. the tools to make computers approachable for the old are the fundemental primitive that the young understand comptuers throguh . its ahoreseshi ( horse shoe)
xcomputers must be increasingly MORE addictive . fqast . emotional . no response time given . immediate off th
e cuf f answers . full information throughput betwene interlocutors
charles has not adjusted his body to the netwrok . he is still getting “carsick “ becauyse his body has no t adapted to its new organs
having a new monitor added is like getting a new limb stitched onto your bodyt . conversely. I was mutilated when my diamondtron 2060u broke
stock traders with 30 monitors a re like the hindu dieties
The Exocore Package

Executive Summary
The exocore is a preconfigured package to roll out your own no-code, no-cost personal website as a public exocortex from documents written in simple Markdown syntax, including interlinking, generated backlinks and a nodal graph-rendering. Site’s are rendered in fast, responsive, standards-compliant static HTML.
The exocore is developed by Remilia Corporation as a Jamstack worfklow and extension of Foam to complete the system of an accessible and standardized autopublishing knowledgebase network, as a proof-of-concept for Remilia’s New Internet.
Installation Instructions
Follow the no code instructions to install your exocore and set up automatic publishing with Netlify. Time required: ~30 minutes.
Detailed Introduction
Do you take notes, or conduct personal research? Do you output or collect text or image content in any form, such as a blog, poetry, diary or visual art? Do you intake any form of media, and want to catalogue your findings or thoughts? Do you forget information? The Exocore is a means to store and organize and publish such a bank of information in an easily navigable form.
The exocore comprises a set of a few programs and plugins, rolling them into a package which can be customized infinitely and modularly; without any technical knowledge it can still be made your own, and with even a touch of technical knowledge (particularly CSS or HTML facility) it can be made into anything at all.
Its online component is a scaffolding for a website, and its offline component (fully functional without the online) is a filing system for notes, written output, or other data. Out of the box, it’s a local directory of folders and interacting files forming an empty template for a zettelkasten/personal wiki, a platform for longform articles, a library of documents, a gallery of images, and an automatically created daily diary. Mix and match these features as you wish; they are fully modular and independent. A user would be free to use or not use any of these features, so if they want to create a self-hosted platform like Substack with no extra features, this is facilitated.
In the future, these exocores can comprise a webring linked by automatically updated network pages, as well as a IRC network for which the Exocore will operate as user’s personal homepages. They can also feature things like an automatically updated ‘latest posts’ feed from all other (or selected) Exocores, or just ‘related posts’ (by metadata tags) from your own site.
Breaking down the Exocore

Information Pipeline
Notes are segregated into 4 categories:
- Daily Notes, designed as a quick access scratch pad, and are perfect for low-specificity research dumps and fleeting notes that will inform your notes in future. These are automatically titled by date. One is created each day automatically, and opened when you open VSCode.
- Wiki Notes, designed for single atomic data points, and are automatically titled with a hexadecimal color code. This code is turned into a correspondingly colored badge in the index of the published site.
- Journal Entries, for your thoughts, and are not automatically titled.
- Articles, for longer write-ups on a particular topic.
These note categories together create a pipeline for systematising knowledge over time from the general to the particular, and for capturing a bank of scattered reference material and developing it into a polished final product. For example, you might choose to cite a research dump in the subsequent post that it turned into as a bibliography/further reading section. This workflow is designed to encourage active, daily use of the exocore for all thoughts.
Editing Environment
The exocore is built as an extension on top of the Foam Visual Studio Code package, which is itself an open-source recreation of the Roam learning garden editor. Foam introduces the standard features required for a proper personal wiki system such as:
- Backlinks panel
- Wikilinks aliasing syntax
- Tiling windows
- Note embedding
- Graph visualization
- Sync files on rename
This system provides a powerful and highly customizable dashboard for comprehensive note-taking. On top of Foam, we’ve introduced:
- Segregated note categories with default templates
- Daily note generation
- Automatic randomly generated titling for zettelkasten functionality
- Automatic table of contents generation
- Footnotes and sidenotes
- Suite of Jekyll templates for automatically publishing websites off the collection of notes
User experience:
A user download the package in the form of a Github repository template, which lives on their local machine as a directory that can be manually or automatically synced via git to a web domain, which represents the documents in the directory after they are processed into an eaily-navigable and feature-rich website. Their exocore can be published to the web at no-cost using Netlify’s free hosting and subdomain service.
A user can get by just fine only interacting with simple plaintext markdown files, and can write posts and create hyperlinks between them, add pictures or PDFs and more, without going beyond in-text markdown syntax (read more about the Exocore’s syntax here). They are also able to control how their generated website handles their documents in a human-readable metadata section at the top of each post: tags, title, subtitle, categories, layouts, date, and any others that the user cares to add.

Locally, the directory of notes (which will also be a git repository if you wish to publish as a website online) is managed and maintained through a VS Code workspace.
The recommended extensions for your workspace arrives as a package of two things:
-
A template directory including templates for simple creation of new markdown documents of different kinds (article, journal entry, wiki note, daily note), each treated differently in the rendering of your website.
-
A set of VSCode plugins which offer a suite of features for the user to add to their directory of posts by facilitating easy linking between notes, URL management, and many other features. The directory can be easily hosted for free with Netlify, for which a setup guide is available [Exocore Installation Instructions#1. Deploy your own Exocore to the Web|here].
Jekyll
To view your site before it is pushed online, a user can also set up their Exocore directory to build a local instance of the site with Jekyll. When publishing, Netlify runs Jekyll server-side, so running it locally produces the same site as will be published.
Customizability
The stack is an open-source repo and a suite of open-source programs and plugins, and is therefore ultimately customizable. The level of customizability depends only on your technical know-how, but minimal learnings yield compounding rewards. Here is an idea of the level of control over your final website yielded by advancing levels of technical knowledge:
-
No technical knowledge:
-
You can implement all of the above, and choose from a set of .CSS templates for your website to adjust its aesthetics. You can create posts, use the daily note functionality, store documents in the Library, create ZK notes and links between them, use backlinking, embed notes, and all other features mentioned above. In other words, all features are fully available with no technical knowledge. You should become acquainted with the Exocore’s writing with exocore syntax, but this is easy enough to guess at, or to learn in under half an hour.
For publishing, a very cursory knowledge of git will come in handy, but git has a helpful GUI, and Exocore documentation includes a guide on how to publish your site.
-
-
HTML and CSS
- You will be able to edit included stylesheets and HTML templates to create a site which looks any way that you wish. Both these languages are simple to learn, and even without learning them comprehensively a user can edit the provided templates and stylesheets to make major changes.
-
Jekyll/Liquid
- You will be able to create logic functions to manipulate metadata stored in the markdown front matter, create custom menus or boxes with automatically generated content based on the front matter, assign your own custom front matter variables, and more.
-
Ruby
- Learning Ruby is not at all necessary, but familiarity with it will facilitate you in packaging themes you have created for your exocore as Ruby Gems in case you would like to publish them for use by others. If you want to proliferate your particular model of the exocore, this is an easy way to package it.
Full Tech Stack
Obsidian Plugins:
- Backlinks
- Daily Notes
- Templates
- Obsidian Git
- Templater
- Filename Heading Sync
VSCode Plugins:
See more